How to Record Teams Meeting
Are you struggling to figure out how to record your Teams meetings? Look no further!
This article will guide you through the process step-by-step, ensuring that you understand the ins and outs of recording in Microsoft Teams.
You’ll learn how to:
- Set up recording
- Choose the right method for your meeting
- Manage your recorded meetings for easy access
Plus, we’ll share some tips and best practices to help you make the most of your recorded Teams meetings.
Let’s get started!
Setting up Recording in Microsoft Teams
To set up recording in Microsoft Teams, you’ll need to enable the feature in the meeting settings.
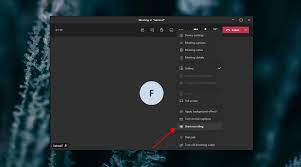
First, open the Teams app and navigate to the meeting you want to record. Once you’re in the meeting, click on the three dots at the bottom of the screen to bring up the menu options.
From there, select ‘Start Recording.’ A notification will appear to let everyone in the meeting know that the recording has begun. Remember, it’s important to inform all participants that the meeting is being recorded for transparency and legal purposes.
After the meeting, the recording will be saved in the cloud and can be accessed by anyone who was part of the meeting.
That’s it! Now you’re all set to record your Teams meetings hassle-free.
Choosing the Right Recording Method for Your Meeting
Selecting the appropriate method for capturing your Teams meeting is crucial. There are two main methods you can choose from: recording within Teams or using a third-party application.
If you opt to record within Teams, you can easily start and stop the recording during the meeting. The recording will be saved to the cloud and accessible to all participants. However, keep in mind that this method may have limitations in terms of features and editing capabilities.
On the other hand, using a third-party application gives you more control over the recording process and offers additional features like advanced editing options. You can choose from various screen recording software available in the market.
Make sure to explore the options and select the method that best suits your needs and preferences.
Step-by-Step Guide to Recording a Teams Meeting
Once you’ve decided on the appropriate method, it’s important to familiarize yourself with the step-by-step process of recording a Teams meeting.
First, join the meeting as a participant or host. Once everyone is present, click on the ellipsis (three dots) in the meeting controls and select ‘Start recording.’
A notification will appear, indicating that the meeting is being recorded. Throughout the meeting, keep in mind that all audio, video, and shared content will be captured.
To end the recording, click on the ellipsis again and choose ‘Stop recording.’ After the meeting, the recording will be processed and saved to Microsoft Stream, where you can access and share it with others.
Managing and Accessing Recorded Teams Meetings
Managing and accessing recorded Teams meetings is made easy through the Microsoft Stream platform where they can be processed, saved, and shared with others.
Once you have recorded a Teams meeting, you can easily manage and access the recording through the Stream platform. Simply log in to your Stream account and navigate to the ‘My Content’ section. Here, you will find all your recorded meetings neatly organized and easily accessible.
From this section, you can process the recordings, edit them if needed, and add captions or subtitles. You also have the option to save the recordings to your personal or shared drives for future reference.
Additionally, you can share the recordings with others by generating a link or embedding them in other platforms.
With Microsoft Stream, managing and accessing recorded Teams meetings is a breeze.
Tips and Best Practices for Recording Teams Meetings
To ensure successful recordings, it’s important to follow these tips and best practices when using Teams for meetings.
First, make sure you have the necessary permissions to record the meeting. Check with your organization’s IT department if you’re unsure.
Next, before starting the recording, inform all participants that the meeting will be recorded. This helps maintain transparency and ensures everyone is aware.
During the meeting, make sure to speak clearly and avoid talking over others to ensure the recording captures all the important information. Additionally, keep background noise to a minimum by finding a quiet location and muting yourself when not speaking.
Finally, after the meeting, promptly save and share the recording with the relevant participants for future reference.
Conclusion
So now you know how to record Teams meetings!
By following the step-by-step guide and choosing the right recording method, you can easily capture important discussions and presentations.
Remember to manage and access the recorded meetings efficiently, and adhere to tips and best practices for a seamless recording experience.
With these tools and knowledge, you can ensure that your Teams meetings are well-documented and easily accessible for future reference.
Happy recording!